OpenQuok Firefox extension
Install the OpenQuok Firefox add-on from Mozilla Add-ons. Sidebar scheduling, Skool connect, directory autofill, and context-menu drafts.
Connect your agent today
Draft from chat, review in your calendar, and publish only what you approve.
Overview
The OpenQuok Firefox add-on helps when a network needs the browser — not only dashboard OAuth or pasted keys. Firefox uses a dedicated build in extension/dist-firefox/. The UI opens in the Firefox sidebar (Gecko’s equivalent of Chromium’s side panel). For a short product tour, see the browser extension page.
On Firefox, install the published add-on from Firefox Add-ons (AMO). Self-host operators build with build:firefox and load a temporary add-on — see Self-host (Firefox build).
See it in action:
| Use | What the extension does |
|---|---|
| Social scheduling | Open the sidebar → Social. Sign in with your dashboard. Pick channels and schedule or draft posts. OpenQuok publishes from the server. Connect channels required in the dashboard with Add Channel. |
| Skool | When you connect Skool in Add Channel, the extension reads cookies from skool.com while you stay signed in there. OpenQuok checks the session and stores it encrypted. |
| Directory launch | Sidebar → Directory: sign in, pick a directory channel chip to open that site and load your product profile, then Fill on the directory tab (on-page panel or sidebar). Or start from My Products with Launch to directory. You submit on the directory site yourself. |
On directory sites, users are required to sign in to OpenQuok.
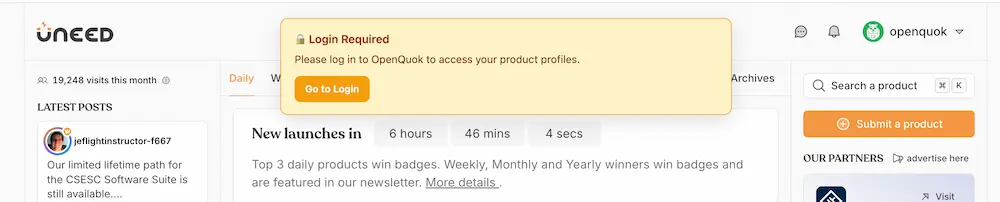
Click Go to Login to open sign in on the same host as your dashboard (including self-host) or the directory login page. See Directory submission for My Products → launch steps.
Note
Skool is the only social channel that uses cookie connect today. PeerPush and Uneed use the extension for autofill only — OpenQuok does not post to those sites from the server.
Warning
Skool connect is not official OAuth. For directories, you must follow each site’s rules when you submit. OpenQuok may change extension behavior if a platform changes access.
Note
The dashboard reaches the Firefox add-on through a page postMessage bridge on OpenQuok hosts — not Chromium externally_connectable. Directory launch handoff from My Products depends on that bridge; verify after manifest or bridge changes.
Install on Firefox
Install OpenQuok from Mozilla Add-ons:
After install, pin the add-on from the toolbar menu and open the OpenQuok sidebar to sign in.
Note
Google Chrome and Microsoft Edge use the Chromium side panel build. See Chrome extension and Edge extension.
Sidebar (Social and Directory)
Click the OpenQuok toolbar icon (or sidebar action) to open the Firefox sidebar. You can also open it from the context menu (see below) — that opens the Social tab.
Dashboard sign-in appears once in a session bar above the Social and Directory tabs (OpenQuok.com, self-host URL, refresh, disconnect). Switch tabs without signing in again.
| Tab | Purpose |
|---|---|
| Social | After you connect in the session bar, pick channels, write a post, attach media, preview, and choose Publish now, Schedule, or Draft. Keep a signed-in dashboard tab open. Use web UI for the full feature (media library, AI tools, large uploads). |
| Directory | See profile status and run Fill for directory destinations on the active tab when the session bar shows you are signed in. |
Composer media (Social tab)
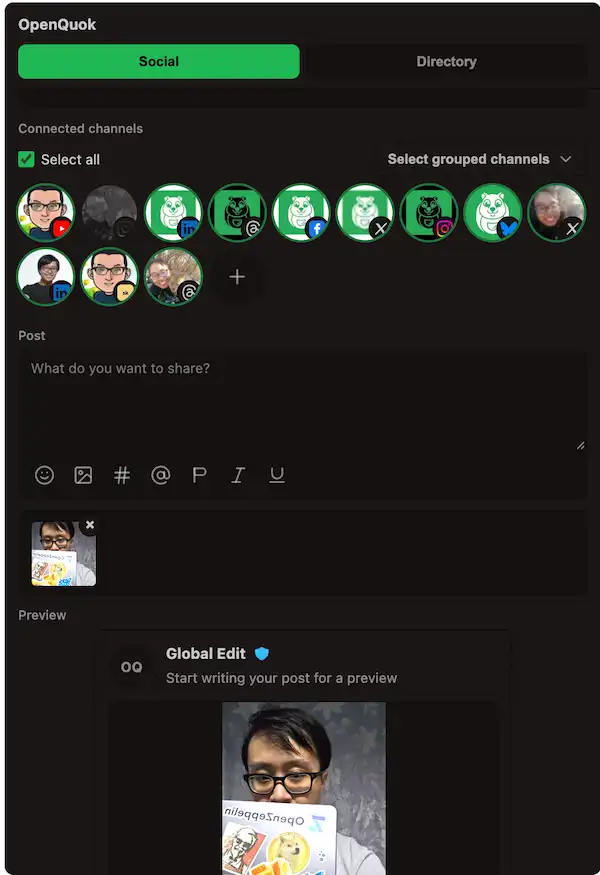
Use the toolbar + to attach images or video. Thumbnails show on your device until you publish, schedule, or draft — then the extension uploads to POST /api/v1/media/upload and creates the post. Remove a file with × on its thumbnail.
| Limit | Value |
|---|---|
| Attachments per post | Up to 10 |
| Single image (client check) | About 30 MB |
| Single video (client check) | Up to 1 GB |
Warning
Oversized or unsupported files are blocked when uploading. Network limits still apply at publish time — use Open full composer for the media library or very large files.
Note
Extension uploads use the signed-in dashboard route, not POST /public/upload. Very large videos may be slow — use the dashboard composer for heavy clips.
Channel selection
Channels appear as avatars above the post field. Use Select all or Select grouped channels for a workspace group. Tap a chip to include or exclude a channel. The + chip opens Add Channel on My Dashboard (or focuses an open account tab).
Note
Local dev (https://localhost:5173): Sign in, keep that tab in the same window as the sidebar, then tap Refresh. If you are still on a production session — sign out on www.openquok.com or use a separate Firefox profile.
Context menu
Right-click on any page:
| Menu item | When it appears | Draft |
|---|---|---|
| Schedule with OpenQuok | Selected text | Body = selection |
| Schedule with OpenQuok | Page background | Body = page title + URL |
| Schedule with OpenQuok | Image | Uploads the image when possible. If upload fails, the URL goes in the body with a warning |
| Humanize selection with OpenQuok | Selected text | Opens /tools/humanizer in a new tab with the selection in the composer (up to about 2,200 characters). The sidebar stays closed. |
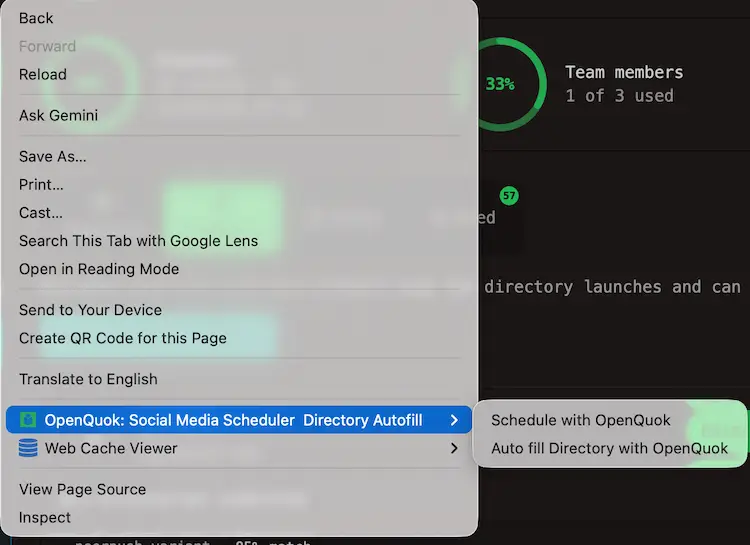
For Schedule with OpenQuok, the extension saves the draft, opens the sidebar on Social, and focuses the composer. Humanize selection with OpenQuok opens the Humanizer tab with your selection in the composer; the sidebar stays closed. The tab uses your active dashboard host when you are on one, otherwise an open localhost:5173 tab, otherwise the host where the extension session is signed in.
Note
Posts still go through your signed-in API (POST /api/v1/posts). Sending directly from a live platform tab is planned for cookie channels but is not in the current build.
Who needs this
| Audience | Action |
|---|---|
| Social scheduling | Install the add-on in Firefox, open Social, sign in, and schedule to channels you connected in the dashboard. |
| Skool | Install in Firefox, stay signed in on Skool, then use Add Channel in the dashboard. |
| Directory launch | Install the add-on, complete a product profile on My Products, then launch to PeerPush, Uneed, or another supported directory. See Directory submission. |
| Self-host operators | Build dist-firefox/, load as a temporary add-on in about:debugging, set firefox:<add-on-id> in VITE_OPENQUOK_BROWSER_EXTENSION_IDS, and verify host permissions on the merged manifest. See Extension (Firefox). |
Environment variables (web)
On Firefox, the web app detects the add-on through the page runtime bridge and optional ID map entries — not chrome.runtime.sendMessage from arbitrary origins.
| Variable | Purpose |
|---|---|
| VITE_OPENQUOK_BROWSER_EXTENSION_IDS | Include firefox:<add-on-id> after AMO publish (default gecko id [email protected] in manifest.firefox.json unless AMO assigns another). Pair with chromium:… / edge:… when users may run multiple browsers. |
| VITE_OPENQUOK_BROWSER_EXTENSION_ID | Legacy single Chromium ID only — insufficient for Firefox-only workspaces; prefer the multi-ID map. |
Copy from web/.env.development.example into web/.env.development.local. Restart the dev server after you change it.
Note
Skool connect does not need OAuth keys on the server. Directory autofill reads profile data from OpenQuok over the same session link. See Connect a channel and our Privacy Policy.
Self-host (Firefox build)
Operators who build from source: run pnpm --filter @openquok/browser-extension build:firefox, load dist-firefox/ as a temporary add-on, set VITE_OPENQUOK_BROWSER_EXTENSION_IDS, and confirm host_permissions cover your dashboard origin. Full steps, AMO zip, and bridge verification live in Extension (Firefox) under Configuration - Web.
Manual verification checklist for self-host
Use this after you build or update the Firefox add-on from source. Use a Firefox profile where you are signed in to OpenQuok with at least two social channels.
Checklist for Social Tab
Session and channels
Connect in the session bar above the tabs — the Social tab shows the composer and the connection label stays visible when you switch to Directory (no duplicate sign-in banner). Select all or Select grouped channels. Tap + — it opens Add Channel on the account page. Schedule a post. Optional: right-click text → Schedule with OpenQuok — text appears in the composer.
Media and preview
Attach a media. Remove one with ×. Try an oversized file — error before upload. Draft or schedule with media only (empty caption) — post has media on the dashboard. Right-click an image → Schedule with OpenQuok — preview or URL fallback behaves as expected. Confirm Preview updates; one channel vs many changes preview style. Open full composer still opens the dashboard editor.
Checklist for Directory Tab
Panel and Fill
Switch to Directory — text and buttons are readable on the sidebar theme. Smoke one Fill on PeerPush or Uneed when you use directory launch.
Directory avatar and handoff
Tap a directory avatar — the Fill UI opens on the directory tab when you are signed in with a product profile. From My Products, run Launch to directory once and confirm the dashboard handoff reaches the add-on through the page bridge.