Overview - Creating Post
Write, preview, and schedule posts in OpenQuok — the post editor, channels, media, previews, and scheduling.
Connect your agent today
Draft from chat, review in your calendar, and publish only what you approve.
The post editor
Write captions, attach media, preview every channel, and save as draft or schedule — all in one window.
Most of your time in OpenQuok happens in the post editor — we also call it the composer.
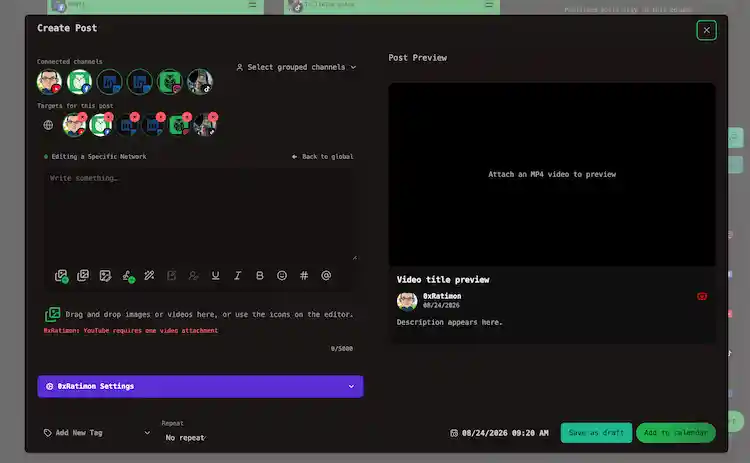
On My Dashboard and the calendar it opens as a modal. The same editor powers Payload Wizard on the public posting API and scheduling API landing pages (sample channels) and at /account/payload-wizard in your workspace for developers who want to copy a JSON payload for the public API.
Where to open it
| Action | Where |
|---|---|
| Create Post | My Dashboard |
| Click a day or empty slot | Calendar |
| Create Post (with saved templates) | My Dashboard or calendar — picker loads a saved template or continues without one |
| Open an existing post | My Dashboard kanban or calendar — see Kanban board and Moving posts |
You need at least one connected channel before the editor is useful. See Connect a channel.
How the editor is laid out
The editor is one window with three main areas and a footer bar.
| Area | What you do there |
|---|---|
| Top | Pick which channels receive this post. You can select a channel group to turn on every channel in that brand at once. |
| Left | Write the caption, use the toolbar, add media, open per-network Settings (Global vs per-channel), and build thread replies or follow-up comments. |
| Right | Post Preview — a live look at how each selected channel will render the post. |
| Footer | Tags, repeat schedule, date and time, and save buttons — see Scheduling for Save as draft, Add to calendar, and Publish now. |
The preview column is worth a glance. Line breaks, image crops, and titles that truncate on one network often show up there before you schedule.
Tip
By default you write in Global mode: one caption shared across every channel you selected. Click a channel avatar to focus it, then Edit content when that network needs its own text or fields. See Global vs per-channel.
Typical flow
Choose channels
Click the avatars at the top. Picking a channel group selects all of that group’s channels in one go.
Write the post
Global mode (globe button) is the default. What you write there goes to every selected channel. See Writing the post for the caption box, toolbar, and character count, and Global vs per-channel when one network needs different text.
Add media (optional)
Drag a file in, use Add media from the toolbar, or pick from your media library. See Media in the composer and Media library for the full page.
Fill network-specific fields
Some channels need extra details — a YouTube title, Dev.to tags, an Instagram post type. Open Settings when a channel is focused. The editor blocks save until required fields are filled. See Per-channel settings and Links and validation.
Pick a time and save
Choose a date and time in the footer, then save as a draft, add to the calendar, or publish immediately. See Scheduling.
Starting from a template
If you saved templates at /account/templates, OpenQuok offers the Select a template picker when you start a new post from My Dashboard or the calendar. A template brings back a channel selection, caption, media, tags, and provider settings so you do not rebuild the same bundle every week. See Templates for create, edit, and filter workflows.
You can always continue without a template and pick channels manually.
Starting from a signature
Signatures are reusable sign-offs — a CTA, hashtag line, or link block. Append one from the editor toolbar, or mark a signature to auto-add when the composer opens.Threads, tags, and plugs
| Topic | Where in the editor |
|---|---|
| Multi-part posts and timed replies | Follow-up comments under the caption; Settings for finisher and plugs — see Threads and comments |
| Campaign labels | Footer tags — see Tag in the glossary |
| Same-account delayed reply | Settings accordion — see Internal plugs |
| Cross-channel after publish | Plug settings — see Cross-account plugs |
AI and automation
You can draft from the editor with built-in writing tools, or queue posts from an agent, the CLI, or the public API. Everything lands in the same review queue on My Dashboard and the calendar. See AI generation, MCP, and Public API.
Platforms are adding AI labels, scans, and community rules — but a draft can still read like a template even when no detector flags it.
Our free Humanizer rewrites social copy in the browser so it sounds more natural (no account required). The signed-in composer also includes Humanize in the editor toolbar. Read why readable copy and platform disclosure are different problems.
Leaving without saving
Closing the composer asks you to confirm — unsaved work is discarded. If you need to step away, use Save as draft instead. Drafts stay on My Dashboard under Drafted posts and never publish until you schedule them. See Scheduling.
Payload Wizard (developers)
Payload Wizard is on the public posting API and scheduling API landing pages with sample channels, or at /account/payload-wizard in your workspace after sign-in. Compose as usual, then copy JSON for POST /api/v1/public/posts. Settings → Developers → Access links to the workspace wizard. See Public API for auth and request shape.